Category Archives: Beef

Burger Bar Planning Tips, part two.


I was re-reading my Burger Bar Bash post and realized, that while I gave you a good overview of how to do it, that a timeline might also be in order.

I think I’ve said, OK, I know I’ve said that I do it all, I’m by way of being a one man band or something like that in the kitchen.

Not a complete control freak, but close.

So, when I do one of these Burger Bars, I make lists.
Guest list, gotta know how many you’re feeding, it really sucks to run out of burgers.  At least I think it would, I’ve never done it yet.

I check what I have in the fridge and pantry first.  I usually have more than enough ketchup, yellow mustard and mayonnaise on hand anyway, but don’t always have brown mustard or BBQ sauce.   And then there are the people who prefer Miracle Whip on their burgers, and I usually have that on hand as well.   I like it on various things as well so…

If I don’t have dill pickles in the fridge, I will have them in the pantry.  I buy them when they go on sale, cause I like to save money.  And I do like to give a choice to people, so I’ll put out some Bread and Butter Pickles as well.    I’ve even put out some pickled beets for those who have a taste for it. (Aussies and Kiwi’s take note).

A grocery list, now that you know how many people are coming and just what you need to buy.  And if you can do this far enough ahead, you can take advantage of sales on a lot of it, and just stock up.  In other words, spread out the spending over a couple of weeks or even months.  Let’s face it, condiments can last a long time in the pantry.

The day before, or even that day, buy your meat and make the patties.  Fresh is best on this.

For the meat, 15 lbs. of hamburger meat will get you 40 hamburger patties.  12 pounds of meat, 32 patties.   6 lbs gets you 16 patties.

See, I did the math for you.

I like to do a 50/50 ratio of ground chuck and ground round.  Ground Chuck can get real greasy all by itself and ground round can be too dry, I like them mixed together.  And, please, please, please don’t smoosh it all together.  You can break up the meat, gently, and layer it together in a large bowl and then form the patties, with a light hand.   I don’t season the meat, but that’s your call.  If I have the time and fridge space, I like making the patties early on the day, and then I place them on cookie sheets in single layers.   If I’m working with a lot of meat, I divide it up into 3 or 4 batches, keeping the rest of the ground meat in the fridge.  Don’t let ground meat get warm, it likes the colder temperatures.  And you’re less like to give someone food poisoning.

If I can, I like to buy my buns fresh, the day of the party.  Mainly cause I just hate stale buns. But the day before is OK.   I used to order them from a local grocery store, when I lived closer to one that carried the kind of buns I like.
Now…
Do a timeline list, personally I need one, because I can then gauge what needs to be done next and how long it takes.   I apportion a certain amount of time for each action.   Give myself an hour to form the meat patties for example, figure out how long does it takes to cut the tomatoes for the burgers.

I’m planning on starting the BBQ at 5 pm and I don’t want to be running around trying to figure out what to do next.  So I write it down.

8 am.  Cook Bacon for Burgers put in an oven safe container and refrigerate
9 am  Prep and Saute Mushrooms
9:30  Cut the cheese and arrange on platter.
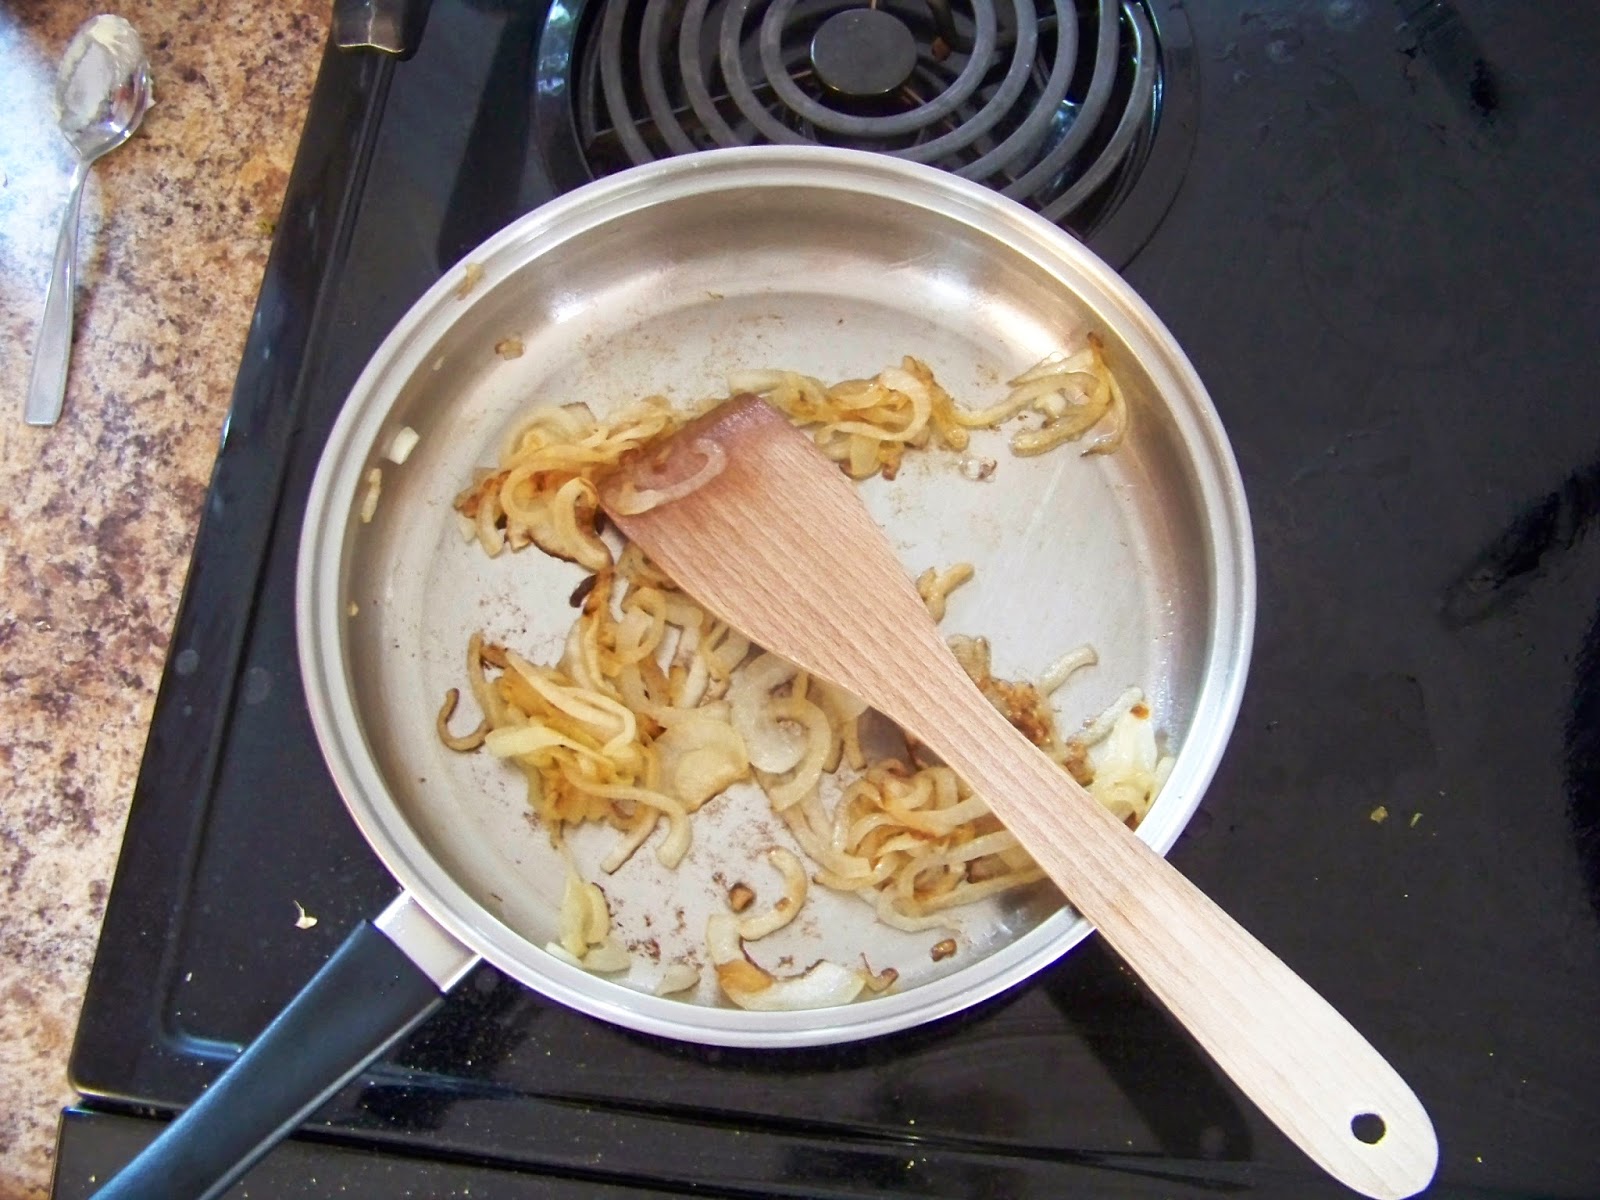
10 am Prep and Saute Onions
11 am Make meat patties
12 noon  cut fresh onions, refrigerate
1 pm shred lettuce/ cut tomatoes
2 pm set up tables, get chairs together  Figure out what serving dishes you’re using, set them out.
3 pm Shower and Nap  This is very important, give yourself time to take a breath, lay down for a minute, meditate, shower, dress and get your makeup on.
4 pm  Set up plates, cutlery and napkins
4:30 set out the ice, if you have an ice chest, I like to give my guests a place to stash the drinks they brought.  I also like to put out lots of bottled water and some soda.  But that is up to you.
4:45  Set out condiments
5:00  Greet guests
if you are grilling right at 5 pm bring out the burger toppings as your guests are arriving.  Enlist their help if you like.  If you have a spot on the BBQ grill for the bacon, onions and mushrooms to warm up, get them out and set that up.  Or just warm them in the oven.

Clockwise from the pretzel bun, lettuce, tomato, pastrami, grilled onions, mushrooms, dill pickle and sliced Vidalia onion.

Then relax, enjoy your guests, grill the burgers and most important of all, have fun.

Burger Bar Bash planning tips


It’s summertime and grilling season for a lot of people, aka the season to eat and cook outside cause it’s too darn hot to cook inside.

Well, kinda.

Personally I like my air-conditioned kitchen, it’s bug free and convenient, for me.

However, I also love to host parties, as you may have gathered from this blog.    And one of the funnest parties is a Burger Bar Bash.

We used to host these at least once a year when we lived out west, and it was always popular.   We hosted a couple at the campsite when we lived in a RV a few years ago.  I had very generous friends who let me use their BBQ grills, cause I only had a small one.  And I no longer even own that one, but I have my George Forman grill and quite frankly I’m happy with that.

But lately, I’ve been craving a good old fashioned Burger Bar Bash again.

So until I get around to doing it, I thought I would let you in on some planning tips.

First off, depending on your pocketbook and budget, you may only want to make all the toppings and have everyone bring their own meat.

I’m kinda funny that way, but I like to do it all.

From the meat to the toppings to the buns, I’m a bit of a control freak that way.

First off, figure out how many people you can accommodate, budget wise, or space wise.

I used to plan on just over one pound of hamburger meat for every three people.  And as I said, I like to ‘control’ it all so I make my own patties.   Told you I was a control freak on this. I learned that a 6 oz. uncooked patty would fill up most people.   And I always make extras, just in case a teenage boy or three wanders in. Quick math lesson, 15 lbs. of hamburger meat will make 40 patties.  And any leftover patties that aren’t cooked, just go ahead and freeze.
And…  I’m rather picky on the whole fat to lean ration on my hamburgers.  I like a 50/50 ratio of ground chuck and ground round.  I want some fat, but I hate to bite into a grease burger.  ***SHUDDER***  And even though I made a mixture, I did not play in the meat.   You can toss it gently together and then just barely pat the patties together.   I also had turkey burgers for those people who don’t eat red meat, as well as Veggie Burgers for those who don’t eat meat at all.  (I’ve been known to just make those for myself, cause I like them).
You can buy the veggie burger patties or make them yourself.  Your call.

And don’t forget the dimple in the burger when you grill them.   They cook evenly that way.

OK, now we have the meat handled.    Well, kinda, I’ll clue you in on one of my fave burgers later.

Next up is the buns.  And here is where I get super, super picky.  I hate, abhor, despise those buns that fall apart as soon as you bite into it.  They just moosh up and well, I won’t buy them.  And usually, the bun is way too small for my burgers and the toppings.   So, I buy French Hamburger buns.   You know the kind, they’re made from French bread, and they do hold up.  And I’ve also been known to buy a loaf of French Bread and just cut it into 4ths or 5ths and make buns that way.  And I’ve just discovered Pretzel Buns, which seem to be pretty sturdy as well.  A good Kaiser roll can work also.  Your call on that one, but please don’t use those puny little buns that get sold in an 8 pack.  I think they’re only good for those cardboard patties some hamburger chains sell, cause they can only handle a two ounce patty, a small squirt of mayo and mustard.
I’m not opinionated on this subject, at all.  Am I?

Condiments are next.  I have the usual,  Ketchup, yellow mustard, brown mustard, BBQ sauce and Mayo.  And have also been know to put out a couple of bottles of hot sauce as well.  I cater or attempt to cater to most tastes.

Then there is the lettuce, tomato and pickles and raw onions.  You can shred the lettuce and place it out in a bowl if you like or just tear up the leaves into quarters and pile them loosely onto a platter.  I’ve found that one head of lettuce will do about 20 or 30 burgers.    I also have two kinds of pickles available, as some people like Dill Pickles and others like Bread and Butter pickles.   I can go either way.  But I have to have a large slice of raw onion on my burger, and I don’t care if it makes my breath funny.  I can always pop a mint.

So there are the basic toppings, condiments, etc.   And it works.

But…

I like to go a little further.

A lot further.

I cook up a pile of bacon, have some good pastrami handy, some sauteed garlic, some caramelized onions, sauteed Mushrooms and two or three kinds of cheese for people to choose from.   I really don’t care for the processed cheese slices, but that’s me.   I usually offer some good Cheddar or Colby Jack, some Provolone and some Blue Cheese.

And here’s where it really gets fun.   Grill your burgers, brown your buns if you like, place them on a big platter and let your guests build their own.

You would be amazed at how much fun that is.
Especially when one of your guests builds a Dagwood style burger and can’t get their mouth around it.

Ummm. that might actually be me.

Oxtails and Onions


I got so excited the other day when I went to the grocery store and found Oxtails on special. giggle.  So I bought a couple of packages.

I have no idea how other people make them, but I like them prepared very simply.  Two main ingredients, time and a little salt and pepper.  That’s it.

Oxtails and Onions.  Oh wait a minute, I think I have a recipe title.  Excuse me for a minute, I’m just going to change it.  Done.

As I think I said before, this is so darn simple, and so very, very good.  The only real trick to making this, is the time factor.   It takes hours, but I guess you could also make it in a crock pot, however, I never have.

I do it the old-fashioned way, in a pot on top of the stove for a couple of hours and then in the oven for another couple of hours.   Oxtails need to cook low and slow for hours.   This renders the meat so lovely and tender.

I think next time, I’ll start it on top of the stove, and then pop it in the crock pot to finish cooking.   Sorry, got sidetracked there, I started thinking.

To start with, peel 4 (four) onions, and either slice them into rounds or strips or whatever you like.  It really doesn’t matter here.   They just cook down into a luscious mouth-watering topping for the oxtails.

Grease a heavy pot, or saucepan with cooking spray, and add about a tablespoon of EVOO to it.  Heat it a little, then dump in the sliced onions and stir them around until they start to turn translucent.  Add the oxtails, give them a grind or two of pepper and some salt and put a lid on the pot, after you turn it down to medium low.

Next, step away from the pot.    Let it cook for about a half hour then give it a good stir.   You will have noticed that the onions have given off a fair amount of liquid, this is a good thing.  Stick the lid back on and let it cook for another half hour or so, and stir.  All you really want to do is make sure that nothing is sticking too much to the bottom of the pot and that it isn’t burning.

At this point I usually just turn it down to low and let it cook for another half hour before I check it again.  If you’re a little nervous here, you can add up to a half cup of water, but unless you have really dry onions, you probably don’t need it.    And the fat that has rendered off of the oxtails, which also contributes  to the liquid.

After it’s cooked down a bit, transfer it to a covered casserole dish and put into the oven at 300 degrees for another hour or two.

See what I mean, the onions are just cooked to bits.  And so good.

Serve with rice or noodles or potatoes or a piece of that wonderful No-Knead Bread you baked yesterday and the leftover mushrooms from the night before.  Well, that’s how I had mine.   And it was good.

I ate my fill, then divided it up into a couple of servings and froze the rest.   I had so many onions that I also put some into a container and froze them separately and will be adding them to the French Onion Soup I’m making soon.

I just love this stuff.

However, Oxtails also make an awesome beef stock for soup.    And I think the next time I find them on special, I’m going to do just that, make a soup and  of course will share the how-to’s here.

Taco’s


We eat Taco’s at least once a week in our house, and it has become my go-to, can’t think of what else to make meal.

Why?
Cause Taco’s are probably next to Pizza!!!! as my DH’s favorite meal.    Wait a minute, I wonder which one he would choose, if he had to choose between them for dinner.  Hmmm, sounds like fun dilemma to put him in, giggle.   But that’s for another day.

Today, I’m sharing how I make Taco’s, and it is easy.  Really, it is.  The most difficult part of them is making the Taco shells, cause I fry them from good corn tortilla’s.  Neither one of us likes the hard taco shells you can buy that are pre-made.

To start with, I make my meat filling.  I’ve been making them this way for over 30 years, and don’t plan on changing any time soon.   Why mess with perfection?

Brown your meat of choice, I use lean hamburger meat, or good ground turkey when I can get it for a reasonable price.   Your choice.

Cook til just starting to brown and add La Victoria Taco Sauce and a little water.  I use either a full bottle, the 8 ounce size and an equal amount of water or a half bottle of the 15 oz size and the equivalent amount of water and let it simmer until it has reduced down.   If you add too much water, don’t sweat it, just let it cook a little bit longer.

While that is simmering away, prepare your toppings, whatever kind you like.  My DH is a purist, lettuce, tomato and cheese.   I like to amp it up a little and add some finely chopped onion and black olives, along with the lettuce, tomato and cheese.   My personal preference is for Colby Jack cheese, shredded.   And since this is my blog, we’ll do it my way.

Now for the tricky part.  Making the taco shells.  I don’t have any fancy equipment to make them the ‘right’ way and since I’ve been doing it my way for so long, I’ve kinda gotten the hang of making them.   I watched Alton Brown one day making ‘molds’ for taco shells, and telling how long to cook each one and I had to laugh.  I just use my tongs, and form them that way.   And you know what, people eat them and love them that way.   I know this cause I’ve had people over for Taco’s before and they ate all the taco’s I made.  We like the yellow corn tortillas here, have tried the white ones, but really, just don’t care for them at all.

To start with, heat your oil.  I have this handy, dandy, really cheap pot that I’ve used for over 30 years to make the shells in.  It looks like, well, it looks like it should have been retired a long time ago.
It is perfect for this, the corn tortilla’s fit right in, and it is shallow enough to move them around as I form the shells.
Place the tortilla in the hot oil, and as the edges begin to crisp a little, turn it over, and let cook another few seconds.

Grab the shell on one side and fold up a little and hold it in the oil until it firms/crisps up, then turn it over and let it finish crisping.
Remove to a pan, I use an old pie tin, and let it sit to drip off the oil.

Continue with the next tortilla and when it is is done, place it over the first.  If you do this right you can get a nice little stack going.

And it helps them to stay warm.   I don’t salt them right away, we tend to be careful of using too much salt around here, but you can certainly salt them as soon as you take them out of the oil.

Then just build your taco your way.  A little meat, a little lettuce, tomato and some shredded cheese on top.

I do mine a little differently.  Cheese goes in first, then the meat, some onions, black olives, tomatoes, some more cheese and at the last some lettuce, but I forgot to take a picture of that one. sigh.


So there you have it, Taco’s my way.   And if you have a favourite taco sauce, use that one.  For us, it has to be La Victoria brand, they just don’t taste right otherwise.

Please feel free to leave me a comment or note or just say Hi. I love to hear from you and am so glad you’re reading my blog.

Grilled Steak and Cheese Sandwich


Some years ago I had an absolutely yummy grilled steak sandwich at a chain restaurant.   That particular restaurant isn’t one we frequent so some time went by before we ate there again, and by this time, they had changed the menu and the sandwich was no longer available.    I cried, but they wouldn’t relent and make me one anyway.

The other day I had a lovely piece of leftover steak and decided to recreate the sandwich.    I’d had that sandwich on my mind for quite a while, and got this AHA!! moment when I spotted this lovely leftover steak in the fridge.    I didn’t have any Swiss Cheese on hand, and the bread wasn’t the same kind, but I didn’t care, I had the steak and there was a bottle of Caesar dressing in the fridge and the next thing I knew I was putting this together.   I persevered and here’s my version, and it was very tasty.

I spread some Caesar dressing on the bread, layered my lovely, very thinly sliced steak on it.

And since I didn’t have swiss cheese, I added some shredded Colby jack cheese on top (which was not a mistake),  then placed another buttered slice of bread on top of that and placed them in the pan.  OK, so I made myself two sandwiches, but it was from a baguette loaf so the slices were really small, I mean, it only really counts as two slices, really it does.

I was kind of hungry at this point and drooling, which wasn’t a pretty sight at all, however, I was able to summon the patience for them to cook, well, grill up in the pan.

The finished result, and yes, one of them has a big bite taken out of it, but I was hungry and it tasted so good.

You need some lovely bread for this, I choose a nice Artisanal baguette, thinly sliced, butter, Caesar dressing, some cheese, and a nice piece of grilled steak.   Mine was medium rare, and it did cook a little more, so I would start with a steak cooked almost as much as you want it.  Cooling the meat before slicing it, is also recommended, as the meat has a chance to firm up and you can slice it very thinly.   (and dare I confess, I would so go and cook up a nice steak, just so I could make this sandwich again).
And if you have a Panini Press or maybe a George Forman grill, I bet it would work in that as well.  In fact I think I’ll haul my George Foreman out, but first I need to go and cook another steak up.
See you later.

Home Made Spaghetti Sauce


Have you ever looked at the labels on commercial Spaghetti Sauce?   Next time you’re out shopping, pick up a can or jar of it and read the label.    Notice the presence of sugar in there, whether it’s in the form of sugar or high fructose corn syrup or something else that means sugar.    I don’t know about you, but I try not to buy anything with HFCS in it and quite frankly, why do you need so much sugar in something that is basically just tomatoes and herbs?

I started making my own spaghetti sauce years ago and we like it much better than any of the commercial brands out there.    I also use it as a base for lasagna, so when I make sauce, I make a lot.   I figure if I’m going to be spending time in the kitchen, I am going to make it count for something.     If you have your own home canned tomatoes, tomato sauce and tomato paste, I applaud you, I don’t so I go to the store and buy tomatoes in several different forms.

As you can see from the picture, I open cans, and then add it to the browned meat, and after that, correct for seasonings.   And I only use the No Salt added tomato products.   We don’t need the salt and certainly don’t miss it either in this recipe.    Check out how much sodium is in those other cans of tomatoes.

I’m waiting.      Surprised?

Now add that to the sugar in prepared sauce, yuck, right?

Begin by chopping up a large onion, I like a fairly fine dice.   Throw it in the pan with some olive oil and cook it till it just starts to change color, then add a couple or three crushed and chopped cloves of garlic.  Put in as much garlic as you like here.   Cook for just a minute or so, and then remove from heat, and reserve in a separate dish.  If using fresh mushrooms, throw them in the pan and just let them cook just for a minute before you add your meat to the pan, brown it and cook until it is no longer pink.   Break it up a little with your spatula and then add the onions and garlic to the meat, let it cook for a few minutes more, then add the Italian herbs to the meat mixture.

Sorry, blurry picture, but you get the drift.

I just found a great product called Gourmet Garden Italian Herbs blend. Check the link out here, http://www.gourmetgarden.com/us/  It comes in a tube and you can find it in the refrigerated section of the veggie section in your grocery store.   It is a little pricey, but well worth it for the fresh taste.     Or you can add some dried Italian seasoning to the meat as you’re browning it, this seems to help open up the flavour of the dried herbs.     While the meat is browning open up those cans of diced tomatoes, tomato sauce and tomato paste.   If using canned mushrooms, go ahead and add them with the tomatoes.  Dump the tomatoes into a large pot, mix it up with your spoon until the tomato paste is incorporated and when the meat is ready, add it to the pot.   Taste it here to help correct the seasoning, and if necessary add more herbs.  You can also add a rich full bodied red wine at this point, just a cup or two.   Add a few tbsp. freshly grated parmesan cheese and then simmer for about an hour over low heat, stirring from time to time.     Cook up your favourite pasta, whether it be spaghetti, linguine, or angel hair and serve the sauce over the pasta or however you like to serve it.    And it makes a lot.

I freeze the remainder and pull it out when we’re in the mood for Spaghetti or Lasagna.

HINT: If using plastic dishes to freeze in, line them with some plastic wrap, this keeps the sauce from staining, plus when it’s frozen, throw that block into a plastic bag, and save the plastic container for something else.  Or just spoon the sauce into a ziploc bag, squeeze out the excess air and freeze flat.
If I’m making Lasagna, I add an additional can of diced tomatoes and then layer it with cheeses and noodles.

This is also a very company friendly dish.  You can stretch it with a couple cans more of tomatoes, a tad more seasoning, cook up lots of spaghetti and serve with a green salad and a loaf or two of garlic bread.

Here’s the recipe;

1lb. lean ground beef (feel free to use Ground Turkey instead)
1 lb. Italian sausage, removed from casing
1 lg. onion, diced
2-5 cloves garlic, minced (to your taste)
8 oz. fresh mushrooms, sliced or 2 small cans mushrooms
3  16 oz. cans diced tomatoes, no salt added
2-3  6 oz. cans tomato sauce, or 1 lg. can, no salt added kind
3 cans regular tomato paste
1 can tomato paste with Italian herbs added
1/4 tsp. (or more) red pepper flakes to taste.
3-4 tbsp.  Gourmet Garden Italian Herbs, or 1-2 tsp.  dried Italian Seasoning.
1-2  tbsp.  Amore Double Concentrated Tomato Paste 
2-4 tbsp. freshly grated Parmesan Reggiano cheese
Olive oil for browning.

You can also add a couple of cups of a good red wine to the sauce, my DH doesn’t care for the taste, but it does add a richness that can’t be beat.

Navajo Taco’s


Now that you know how to make a great Chile, you can use it to make some Navajo Taco’s.  Of course if you like your Chile straight up in a bowl with some chopped onions and cheese on top, this may not appeal to you.

I met my first Navajo Taco at a State Fair, and fell head over heels for them.  I would wait in anticipation for the next year so I could get another one.

Then a local restaurant opened up and I could go there for my fix.   Now I’m not sure just why I thought I could only have this dish at a restaurant or at the Fair, but somehow I did.   Then one day it hit me, I could make this on my own.   Whoo Hoo.   So I did, and now I’ll share it with you.    In fact, I prefer my Chile served like this now.

To start with, make some good Chile, either my Firehouse Chile or your favorite recipe.    Make some Frybread, either by using a good frozen bread dough, thawed and rolled out or patted out into a large thin circle, fried in some oil.

Place the Frybread on a plate,

put a heaping spoonful of Chile on top,

then add some shredded cheese, some shredded lettuce, diced tomatoes, a spoonful of sour cream if you want and dig in.

I also like a sprinkle of black olives and some chopped onion on top as well.    I eat this with a fork and knife, but if you can get your fry bread big enough, you can actually fold it in half and eat it like a Taco.   You’ll need a bib and a change of clothes, cause that Chile will drip, but it is good.   Just sayin…

Now, since that made me hungry, guess what I’m going to go and have, yup some breakfast.   But we’ll be having Navajo Taco’s again soon.

Stuffed Grape Leaves, Syrian Style


I’m so excited, I’m going to learn how to make Stuffed Grape Leaves, giggle.  Now these aren’t Dolmathes, the greek style Dolma, these are Syrian style.   And I’m just lucky enough to have a friend who asked me if I was interested in making some with her.   I couldn’t believe my ears, someone asked me if she could come over and make something with me in the kitchen.  I love it.  And especially since I get to make something I’ve never made before.  I’ve had Dolmathes, and they were good, but these are a little different, a different riff if you will.  (very suitable for me to say this, since it’s a musician who will be showing me some new notes in my kitchen).   Oh and another friend is coming over to make Baklava as well.   How lucky can I get?   Sorry, bursting out with big grins here from excitement.   I’ve had Robin’s Baklava before and I know how additive it can be.   And now I’ll learn how to make it as well.  But that will have to be a separate post.

I wrote the above last week when I was all excited.   Now that the big day has come and gone, well, all I can say is I had so much fun.    Debi Jordan is my musician friend ( Shameless plug for her music here) and I gotta say she rocks it in the kitchen and is welcome any time she wants to come on over and cook with me.   Especially when I can expand my repertoire a little.

Now, you will have to bear with me, cause nothing got measured out, so a lot of it was ‘eyeballed’ and a smidge and a dash and some of this and some of that.  But I can guesstimate pretty well so…   I also did a little shopping and picked up a jar of grape leaves as well as a couple of other things.   We didn’t use the couscous, but I can use that when I make some Tabbouli again.

Debi cutting up onions, she already has the grape leaves spread out

To make the stuffed grape leaves you need grape leaves, and they come in a jar.  Debi prefers Orlando Brand, California style.  I also picked up a jar just in case, but we had more than enough and we didn’t get a count on just many of those little suckers we rolled.   There are a few things you need to know about grape leaves, one is that you must remove them from the jar and gently flatten them onto a plate so they can relax a little and unfurl.   Another thing to know is that there is a right and a wrong side on grape leaves.  You always put the meat or rice on the inside of the leaf, where the main veins are.  The smooth side is always out.   Another tip, you nip off the end of the stems as you don’t want them inside.   All that being said, let’s get on with it.

I ground up some lamb and some beef.   There was about three pounds total.

I love my KitchenAid, it does so much for me.

Put that in a big bowl and Debi added some rice and seasoning.   There is the other thing, she used a spice mixture called Syrian Pepper.

All ready to mix together.

Which is basically a mixture of black peppercorns, allspice, cloves and nutmeg, all ground up together.   Some recipes call for cinnamon as well.   This was a new taste for me, and while I was a little hesitant, I found I liked it.  I’m not all that fond of Nutmeg, but it was complemented very nicely by the other spices.  Recipe for Syrian Pepper at the end of this post by the way.

Debi added about a cup or so of rice into the meat mixture, she did what many good cooks do, she eyeballed it.  Of course she has made this many times before so she knew the right proportions.    I’m guessing she also added almost a tablespoon of Syrian Pepper as well as about 1/2 teaspoon of salt, and 1/2 teaspoon of regular ground pepper.   She mixed that all together and we commenced to rolling.

Open the grape leaves up, with the vein side in, take about 2 tablespoons of the meat mixture and form it into a cigar shape.  I found out later, we actually put too much meat in each package, but it’s all good and a learning curve.

 Tuck the base of the leaf up and over the meat, and fold in the sides, just as if you were wrapping a package, you don’t want any loose leaf hanging out.
Roll it up into a cylinder, making sure that the leaf stays tucked in.   You want it tight but not too tight, the rice will expand as it cooks and you don’t want a bunch of burst leaves, it would totally defeat the whole concept of stuffed grape leaves.   Also, you place them in the pot seam side down.   If you don’t they will come undone.    And I need to add something else here.  Some of the grape leaves were stuffed with rice which we’d par cooked with some of the Syrian pepper and Za’atar for a vegetarian version of the Stuffed Grape Leaves, so if you have a vegetarian around, you can safely serve them some grape leaves as well.

Once we got all the meat and rice rolled into nice little rolls, it was time to cook them.   As they were rolled we placed them into a large pot (and I neglected to get a picture of that, but hey, I was busy rolling), and covered them with water with about a cup or so of lemon juice and some garlic cloves. This was left to simmer for about an hour or until the rice was cooked.  Debi said she could tell when they were done by the way they smelled, but I caught her taking a taste test.   We then turned off the pot and let it sit while the rest of the meal was prepared.

While I was busy grinding the meat, Debi was making a Syrian Salad, isn’t it gorgeous looking?   as well as the Lebhan, which is a yoghurt sauce.

In the salad was Spinach, Red Onions, Beets, Cucumbers and Feta Cheese.   She finished it off with some Za’ tar seasoning, roasted pine nuts and olive oil and lemon juice for the dressing.

Also along the way, I did take a few pictures of the Baklava as it was being built, which is another post entirely.

However, some phyllo dough was left over and there was still some feta cheese as well as pine nuts and so Debi made some Spinach Pies.  After Robin lined the muffin tin with some phyllo dough brushed with butter.   These were baked off and wow, now I know how to make a version of Spanakoppita or I’ll just call them Spinach Pies, giggle.  They may not have looked real purty, but they sure tasted good.

Stuffed Grape Leaves, Spinach Pie, Leban Salad and Yoghurt sauce.  A really great meal.

We finished off the meal with some Cherry Tarts that I’d thrown together earlier in the day, as the Baklava needed to age before we could eat that.

And Robin was right about that.  I snuck a piece the next day, but it is now covered and waiting out of temptations way, I hope.   I’ll eat some in a few days.

SYRIAN PEPPER:
3 ounces whole allspice
1 ounce whole black peppercorn
5 whole cloves
1/2 teaspoon ground cinnamon
1/2 teaspoon grated nutmeg
Directions:
1
Grind the allspice, pepper, and cloves in a food processor, coffee grinder or blender.
2

Add the cinnamon and nutmeg and pulse briefly to combine

So there you have part of my cooking adventures, I so love it when someone asks if they can come over to my house and cook, especially when I get introduced to a cuisine I’m not familiar with.    We had some laughs, I learned how to roll a grape leaf and now I have a supply of Za’atar in my cupboard.

Leftover Roast Beef reborn as Philly Cheese Steak Sandwich


I made a lovely rump roast over the weekend, and ended up with a lot left over.  And the question was raised, at least in my mind, what to do with the leftovers.    Now, the piece that was left was lovely and rare, and very lean.  And I knew I could cut it very thin and I could make a nice Beef Dip or French Dip with it.   And I might still, but what got my mouth-watering was a nice Philly Sandwich.   This is not to be confused with the ‘real thing’, this one is the version we’re familiar with down here.    There used to be a restaurant locally that had the best sandwich and when you ordered it ‘all the way’, it came complete with mushrooms and jalapeno’s, the pickled kind.   And it was very, very, good.   The nice cheesy, oniony, peppery, oozy kind of good.   I made many attempts to replicated it and it wasn’t quite right.      But I think I’ve finally nailed it.   *giggle* Just need more cheese the next time and to let it melt into the onion/pepper/mushroom mixture a little more, then again, I like cheese.

Here’s how I put it together.    I sliced up some green peppers, and sautéed them in a little EVOO and butter, just till they were done.  Sliced up some Onions, sautéed them with a little more EVOO and butter, just til they were translucent and then added sliced Mushrooms.  And a little more butter, giggle.  sautéed them all together for a few minutes.


The olive oil is good for you anyway and keeps the butter from browning or burning as easily.
 

Then I took some very thinly sliced roast beef, some of the veggie mixture and a few slices of pickled jalapeno’s (only add jalapeno’s if you want heat) and put them into a separate pan, and basically let the veggies warm the meat, and finished cooking it a smidge more.   You don’t want to let the meat cook too much more, as it toughens it.  (Trust me on this, I know whereof I speak).   I cut the rolls in half, buttered them and quickly browned them in a pan.   As soon as they were done, I heaped the meat/veggie mixture on top, added a couple of slices of mozzarella cheese, and some shredded cheddar cheese (cause I could), and placed them under the broiler in the oven until the cheese melted.     And there you have it.     And they were good.    Next time, though, I will use provolone cheese, as I think its melt point is better, and makes for a more gooey sandwich.

Hamburger Steak


One of the dishes my fellow cook makes for the Senior’s lunch on Thursdays is Hamburger Steak.   When she makes this, we get a lot of compliments and people tend to lick their plates, when no one’s looking,  that is.     I love Salisbury Steak myself, but really hadn’t gotten into adding a lot of stuff to the meat.  I usually just season the meat with some seasoned salt and pepper and then cook them.
Last night I thought I would try making Robin’s recipe for Hamburger Steak at home.   And it was good, but I have to say, not as good as when she makes it.   But I still thought it was tasty.   Enough so that I’m going to share it with you.

Take a pound of hamburger meat, season with some Cavender’s Greek seasoning.   I used about 1/2 teaspoonful, one minced onion, 1/4 teaspoon pepper, one egg, 1/4 cup milk and 1/2 cup panko bread crumbs.   Mix together and form into 4 good-sized patties.

Use your finger and make a dimple in the middle of each patty and then go ahead and fry them in a lightly greased pan.   (the reason for making a dimple in the middle of each patty is so that it cooks evenly.  Otherwise the meat plumps up in the middle and oftentimes the middle is rarer than the outer edges.   And it cooks faster as well)

Cook til the internal temperature is about 160 degrees.

With the egg in there, you don’t want to be eating them medium or rare.  After the patties have finished cooking, remove to a separate platter and keep warm.  Drain most of the fat out of the pan, reserving about 2 tablespoons.   Deglaze the pan with some water, I like to use the water potatoes have cooked in, about a cup or so, then thicken with some flour or cornstarch.   You can also make a packaged brown gravy and add it to the pan juice instead of the flour.
Serve with some lovely sauteed onions and mushrooms

Gotta have those on my meat.

Then just plate the Hamburger Steak with some potatoes, maybe some fresh corn or your choice of vegetables.