Category Archives: Main Dishes

Heavenly Orange Pork Fritters


I had a hard time coming up with a name for this recipe.   sigh   I had this long and wonderful and totally descriptive name for this, but then people kept calling them Pork Fritters, so they are now Heavenly Orange Pork Fritters.

I went to the ‘big city’ with a friend last week and we stopped in at this little store, called Smashing Olive.   Big mistake on my part.   I tried several of the oils and could have drunk a glass full of the Balsamic Vinegar, it was so good.

The mistake on my part?  Well, I only bought a couple of the oils and vinegars and now I have to go back and buy more.  But, I can wait for a week or two before I go back there.

maybe

At any rate, it was Boat Club this week.   We’ve had a summer hiatus, and  people are now back and chomping at the bit and ready to cook and eat and enjoy themselves.

I decided to try using the Mandarin Fused Olive Oil along with the Balsamic Vinegar to make a marinade for the pork tenderloin.   I whisked together roughly equal parts, with a little more oil than vinegar.  Then I went out to the garden and raided my oregano plant and used my mezzaluna to chop up the oregano leaves.

Added those into the marinade and coated the tenderloin and stuck them in the fridge.  After an hour, I decided that I needed to add a minced clove or two of garlic to the marinade, and then the ginger said, use me too, so I used my microplane and added about a half teaspoonful.    I love keeping ginger in the freezer, even if it talks to me sometimes, it’s just so handy.

I was trying to keep it simple.

I didn’t make a lot of marinade, so I used one of my trusty gloves and massaged the marinade into the pork tenderloins, very gently.  I didn’t want all that porky goodness to be overtaken by the orange, I just wanted a hint, to enhance.


After they’d rested in the fridge for a couple of hours, I proceeded to use my meat mallet on them.

You can get out a lot of frustrations that way.

I pounded them out quite thin, then did the flour dip, then an egg wash and finally  pressed them into some panko, and fried them quickly in a little hot oil.


When the pork is pounded out this thin, it only takes a minute or so to cook, so just go ahead and brown them on each side.  I use peanut oil to fry them, as it is a mild oil.

And you know I taste tested this as well.
There was a lovely hint of orange in finished pork fritter, before dipping it into the dipping sauce I made.  I think maybe I could have used more of the oil, and maybe next time I will.

I’m thinking of all kinds of ways to use this Mandarin Fused Oil.

I served the fritters with a dipping sauce and I’ll share that recipe with you later on.     The dipping sauce is what totally blew this away.

Cheese Rellenos with Hatch Green Chiles


I felt like I had to point it out that I’m making Cheese Relleno’s with Hatch Green Chiles.

I was so excited when I saw them at the market last week.  There is such a short window when they are fresh and available and since my three Anaheim Chile plants did very poorly this year, we’ve not had Chile Relleno’s for quite awhile.

I know I’ve posted about how to make Relleno’s before, but I thought I would just go ahead and tell you all about how to make them again.

First off, you need to char the skin off, and I told you how to do that the other day.
Next up is the batter and the cheese.
Batter up!
Sorry got confused there, but these would be great after a baseball game, a little too messy to eat there though.

I made us five Relleno’s from the wonderful chiles I found at the market.   The rest are safely tucked away in the freezer for a few more meals.  I did count how many I had prepared though, 42.  Which by my reckoning means 8.4 meals.   I’ll probably use the extra two chiles in some Chile Verde later on.

Peel and seed however many chiles you’re making for dinner.  Pat them dry, and set aside while you make the batter.

Batter:
5 eggs, separated
5 tablespoons flour

Beat the egg whites until stiff, then fold in the flour, carefully.

And there you have it, however, I hate to waste the yolks so I add in about half of them.  Stir the egg yolks together, and add a little at a time, or just dump them in like I did, whoops.

Folding very carefully.   Set aside.

Chiles and Cheese
Slice some Monterey Jack cheese into finger size or larger chunks.   Measure against the chiles, and make them just a tad narrower than the chiles you’re stuffing.

Pick up a chile, and place a piece of the cheese inside.

If you’ve ever put a sock on a toddler or infant,  just think of stuffing a little foot inside of a sock or shoe.   You need to be careful of the foot and the sock.

Don’tcha just love that claw like hand, clutching the green chile?
Prepare each chile, then dredge in a little flour,

then dip into the batter and place in an oiled pan.  I found a trick this time, I picked the chile up from the batter with my meat fork, and then put it into the pan.  Worked like a charm.  Can’t believe I hadn’t tried that before.

I use about 1 tablespoon of oil per chile.  Cause that batter is like a sponge and it soaks up the oil like you wouldn’t believe.  I love my cast iron pan for this.  It holds the heat and yet, because it’s well seasoned, it also doesn’t stick.

Cook over a fairly low heat for a few minutes until one side browns, then flip over and cook the other side.  If my batter is too thin, I’ve been known to drizzle a little more batter on the uncooked side, just before I flip it.  Take out of pan after browning and continue until all the rellenos are cooked.

Serve with your favourite enchilada sauce.

See that lovely oozy cheese in there, sooo good.
We just eat it like this, but you can always make some rice and beans and serve alongside.

Hatch Chiles


I kinda, well almost,  got carried away last week.

OK, so I maybe bought a little much, but we’ll use it all.

I’m talking Hatch Chiles from New Mexico.   They’re only on for a short while, and when they’re gone, they’re gone.

I was in the ‘big’ city and decided to check out a ‘new to me’ market.

As I drove up to it, there was a huge sign in the window.    Hatch Chile Day was going to be held on Saturday.   Well, it was Friday when I saw the sign, and there was no way I was going to drive 60 miles just to attend a Hatch Chile Day, the next day.
So…
I went in the store figuring that if they were having this extravaganza the following day, that they would probably have a few chiles in stock.
They did.
I bought a bunch.  I would have bought more than I did, but I knew I had limited space in my freezer, so I only purchased just over 8 lbs.

Which is enough for a few meals for us.
Guess what we’re having for dinner soon.
*giggle*

At any rate, it’s been a long time since I’ve had such a gracious plenty of peppers, the three Anaheim pepper plants I planted this year have yielded very little.   I think I’ve picked 5 peppers so far, really pitiful.

The Chiles’ I bought last week are huge, I mean really big, three of them will be more than enough for a dinner for the two of us.
My mouth is watering as I type this.

I got out my trusty camp stove, hooked it up and proceeded to char the skin on all those chiles.
What a job.


And you do need to do this.  The skin is pretty inedible. I have done this in the oven, but don’t care for how ‘cooked’ the chiles get.
After charring, I put the chiles into a ziploc bag, so they can ‘sweat’.   It makes it a whole bunch easier to remove the skin if you do that.

I then cut the end off, and remove the seeds, and the stem.


You can also take a paring knife and scrape the skin off as well.

All ready, well, almost.  I usually take a paper towel and wipe them down at this point.  But if  there are a few little blackened charred bits left, that’s OK, they just add to the flavour.

And if there are any pesky little bits of skin still clinging, I just work the tip of the paring knife under and take it off.

These Chiles are ready for step two, which is to be made into Chile Relleno’s with Cheese.
I’ll go through the steps for that later on.
I need to go and put the rest of the chiles in the freezer for future meals.

And here’s a tip.  Go ahead and freeze the chiles as is, charred skin, seeds and all in a single layer.  After freezing, stick them into a ziploc bag, as many as you’ll eat for a meal, and when you’re ready to use them, take them out of the freezer and run them under some warm water for just a second or so, and the charred skin will wipe right off.   You might still have a few pesky hanger ons, but the most of it, just wipes away.  You can then cut the ends off, and pull the seeds right out.

Gotta go make dinner now, but wanted to let you know what I was up to.

Chicken Balls


I finally done did it!
I made some incredible, just like the restaurant, Chicken Balls.
I’m so happy.

Honestly, I think I need a life.
Nah.

Sorry, I got side tracked, again.

I love Chinese food, but as I said before, I live 30 miles away from the nearest Chinese restaurant, in either direction.    And to think I used to just take running out to get Chinese food, casually.  sigh.
But that’s OK, it just makes me stretch my cooking chops.
Did that make sense?

Well, for years I’ve experimented and tried and failed to make a good, light, crisp coating for one of my husband’s favourite dishes.
Chicken Balls with Sweet and Sour Sauce.
I nailed the sauce years ago, but the coating for the Chicken Balls, well, let me say, we’ve eaten a lot of marginally good chicken balls, and a few recipes have been offerings to the Kitchen Goddess.

Not any more.

I nailed it.

I found this recipe by Kittencals on Food.com  Sweet and Sour Chicken Balls 
And I will never, ever, ever make them any other way.

Recipe:
1/2 cup all-purpose Flour
1/2 cup Cornstarch
1 tsp. Baking Soda
1 tsp. Baking Powder
1 tsp. sugar
1 clove garlic, mooshed through the garlic press or
1/4 tsp. garlic powder or more to taste
1/2 cup + 2 1/2 tablespoons Cold Water
Oil for frying.
2 boneless, skinless chicken breasts cut into pieces
or
2  boneless pork chops cut into pieces.

Whisk the first 8 ingredients together and let sit for a couple of minutes, while the oil is heating.  If you have a Fry Daddy, use it.   I have a Fry Baby, and it heated the oil perfectly.   If not, then heat the oil to 375 deg. in a pot, and monitor it carefully.    The oil should be at least 2 inches deep.
Cut the meat into small pieces, and dip them into the batter, and then into the hot oil. Let them cook for a couple of minutes, until golden brown, remove and let drain in a sieve or on something where the oil can drip off.

Serve with Sweet and Sour Sauce, Chow Mein and Ham Fried Rice.

I have to say, this was so good.   I actually did one chicken breast and one pork chop.   And there was just enough batter.   And more than enough for the two of us.  There probably was more than enough for 3 or more people.  But I like leftovers, so…

I’ll probably play around with this a little more, but for now, my mouth was happy.  Very happy.

I think this could also be made gluten-free, using the cornstarch and some gluten-free flour.   I’ll be experimenting with it later on.

And the Ham Fried Rice.

Well, I do it my way as well.  Cook the rice and set it aside to cool.  Chop up some ham, and half an onion.  Saute the onion in a little oil, just til soft, add the ham, stir it around a smidge, then add the rice and some soy sauce.  Fry it for a couple of minutes, then add a half cup or more of bean sprouts, and stir together.  Serve with some chopped green onion on top, and even a little egg.

Chow Mein


I never used to like veggies, and in fact, like most kids I would look at certain foods with a great deal of suspicion.   And would refuse to try it, if it didn’t look ‘right’.

My parents would then counter with the argument, “How can you tell you don’t like it if you don’t try it?”

I bet you’ve had that argument with various members of your family as well.
Go ahead, admit it.

Well, before I was allowed to say “I don’t like it”, I had to eat at least one bite.  I still don’t like cooked peas, but because I tried one bite, I was allowed to say “I don’t like them”.

I did that with a  lot of veggies.  Squash, cauliflower, broccoli, cooked carrots, cooked peas…

But, at least I tried them.

And now, well, let me just say this, if my Mom could see me now.

I love veggies, pretty much any kind you care to put in front of me, I’ll eat.  Still not too fond of plain cooked peas, but…

Which leads me to this dish.

Chow Mein
To be honest, I haven’t had this in a long time, but I’ve been trying to eat cleaner, healthier and even though this is part of a larger meal, at least I’m eating veggies.

And since I’m also craving some Chinese food and the nearest Chinese restaurant is 30 miles away, I’m going to make my own.

Chinese food that is.

I’m making some Chicken Balls with Sweet and Sour sauce, Ham Fried rice, and this, Chow Mein.

Chow Mein (Sid style)
2 stalks celery, sliced on the diagonal
1 carrot, cut into coins, on the diagonal
8 oz. mushrooms, sliced
1 onion, sliced into slivers
1/2 cup fresh bean sprouts
2 tablespoons Soy Sauce
1/2 cup chicken stock
1/2 cup Chow Mein Noodles
1 tbsp. vegetable oil
1 tbsp. Sesame Seed Oil
1 sliced, cooked chicken breast or cooked pork chop if desired.
Sesame Seeds to taste and garnish

Saute the celery, carrots, onions, mushrooms in 1 tbsp. oil, til just barely cooked,

add the 1/2 cup chicken stock, and Soy Sauce,  then stir in the Chow Mein Noodles,


and put a cover on.  Let steam for about 4-6 minutes,

then add the fresh bean sprouts and the cooked, sliced pork chop and stir in quickly.
Fold in 1 tablespoon Sesame Seed Oil.   Serve immediately with a sprinkle of Sesame Seeds.


You might have noticed, I didn’t add salt.  The Soy Sauce has enough salt in it.

To make this totally vegetarian, you can use vegetable stock instead, and to make it gluten free, just use some bean thread noodles or rice noodles.

This is my plate from last night.  Some Ham Fried Rice, and hiding under the sesame seeds, the Chow Mein, alongside some totally awesome Chicken Balls.

I kinda like Sesame Seeds…

And I got to eat the leftover Chow Mein for breakfast.
It was a pretty balanced meal.   Veggies, carbs and protein.

Pork Tenderloin with Herbs.


One of the best parts of visiting family, is not only getting to visit and talk and visit and talk, but the food.  All my family are  great cooks, and I get to try a lot of new foods usually when I visit.
My last visit with them was pre-blog days, so while I enjoyed the food, I didn’t really pay as much attention to the recipes.  I did take home some recipes the last time.

100_8560

This time however, I was a bit obnoxious with my picture-taking.

Not really, cause they know I’m a little nuts about food and preparing and eating and …

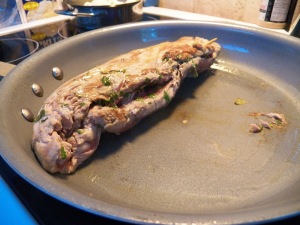
One night for dinner my sister prepared a really simple, and oh so delicious meal.  She took a pork tenderloin and laid on its side.  Cut a large slit in the side,making a pocket and stuffed that with a few chopped fresh herbs from her garden.  Just some oregano and parsley.

She then sautéed it in a pan, just to brown it, and put it into the oven at 425 deg. for about 25 minutes.

100_8555

Took it out, made a little pan gravy from the sauté pan and the pan she cooked it on in the oven.

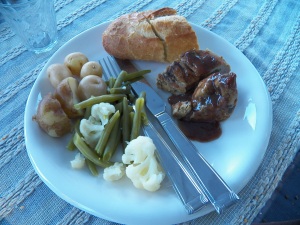
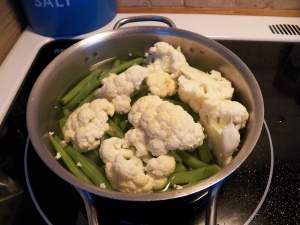
And we had it for dinner.   She  served it with some green beans and cauliflower that she’d cooked together as well as new potatoes and a chunk of crusty bread.

100_8557
I was in heaven I tell you.   And I’m heading to the big city in a couple of days and I’m picking up a couple of Pork Tenderloins so I can recreate the meal.

I guess I probably need beans and cauliflower and new potatoes and bread as well.

I’ll share all how I did it when I make it.

Low Country Boil for a crowd.


I love a good Low Country Boil, and so do a lot of people.  It’s really a very simple dish, but oh, so flavourful, and easy to make.   If you have a large enough pot that is.  I do, mainly cause I got a huge stock pot from my DH for Christmas one year.  I asked for a large stock pot, and when asked how big I wanted it, I said very big.  And I got it.  I didn’t realize pots came in extra-large gigantic size.   OK, so it’s only a 20 quart pot, but still…

I was visiting family a couple of weeks ago, and wanted to make them a typical southern dish.  I knew they didn’t have Collard Greens up there, so couldn’t make them a good greens and cornbread meal.  And I was not about to schlep up some frozen greens with me.
Can you imagine the mess in your suitcase as they melt?  Never mind that they would probably refreeze when the plane gets up to 30,000 feet, but on the ground they’d just melt again.
Sorry, got sidetracked there.

I decided a Low Country Boil would probably be something they would enjoy, and I was pretty certain they’d never had one.    And best of all, I knew I could get all the ingredients there.  Well, with one exception, I wasn’t too sure about getting Old Bay Seasoning, so I brought a tin with me.  Which was a good thing, cause only one store had it, and that was what we call a sample tin down here.
I prepare for my cooking adventures.  In fact I think that was one of my Girl Guide motto’s, Be Prepared.  hmmm, gotta go check that one out.  Later.

My sister also let me take over her kitchen, and gee, she had a lovely large stock pot, which I filled to the brim.

I was feeding 14 people, so I prepared accordingly, and when a couple of people weren’t able to make it, we ended up with some leftovers, but leftovers are always good.  (I had some for breakfast the next day).

I’m going to tell you how much of each item I cooked, but please don’t be put off by the quantity, cause if you make this, you’ll scale it up or down according to how many people you feed.

5 lbs. small new potatoes or red potatoes.  Don’t use Russet or any mealy potato, it will just cook out to moosh or mush.
3 lbs. link smoked sausage, cut into thirds.  Use your favourite brand here.  And if you happen to have some lovely garlic sausage, throw that in.  It really goes well in here.
8 ears fresh corn, cut into thirds, or enough so each person gets at least one.
3 lbs. Shrimp, fresh or frozen, doesn’t matter.  If you prefer it shelled and deveined, go for it, again, does not matter.
1/2-3/4 cups Old Bay Seasoning (you can cut this down, but this is supposed to be a spicy dish.)
1-2 lemons, cut in half.
2-4 garlic cloves, optional
1-2 lbs. Crab (I didn’t have any, but you can add this if you like.


Fill the pot with enough water to cover the potatoes and sausages, about half way up the pot or a little more,  add the Old Bay Seasoning, the halved lemons and bring to a boil.
Cook until the potatoes are just almost done, and add the corn.  Cook an additional 5 minutes, and then add the uncooked shrimp.   I added the shrimp on top, and then stirred them in a little, just wanted to make sure they cooked.


Cook another 2-3 minutes and scoop out the shrimp when they’re cooked, set them aside for just a minute while you scoop out the rest of that luscious boil, and place on either a long flat platter, or dump the drained goodies on some newspaper spread out on a table outside. It’s kinda traditional to do that in the south.

The shrimp were cooked to perfection, the potatoes were done and the corn, well, let me put it like this, you don’t need butter when you cook them in some Old Bay.

We also served some crusty bread alongside, just cause.

Add the cooked shrimp on top and tell everyone to dig in.   You can eat this with your hands, but it gets kinda messy.  Just make sure you’ve got lots of napkins or Southern Style napkins handy.  Southern Style napkins would be that roll of paper towel.
We actually had two big platters and we all had more than enough to eat.

As you can see from this platter.   In retrospect, I guess we could have had less potatoes, but hey, when you’re cooking for a crowd, you want everyone to have enough to eat.

The next day I had some of the potatoes and sausage fried up for breakfast and we also took a good helping over to friends of my parents who also got to try some.

We did have dessert as well.    I made a Banana Pudding which is kind of a southern staple as well.    But I’ll share the how and where and when of that on another post.

Kitchari Soup


I admit it, I read a certain magazine every week, it features the ‘diet’ of the week, as well as lots of desserts and other great foods.

And I read it, cover to cover, and save the issues and every so often I try one of the diets.

And well, they never lead to much.

I have found some great recipes along the way.  This one is one of my favourites, it’s a Barley Salad and one I make from time to time, and then eat for over a week, cause it makes so much.

Which brings me to this, Kitchari Soup.

To be honest, I’ve had one too many great meals lately, and the scale is reflecting that fact and not in a nice way either.   I’d call it a liar, but, I can’t argue with cold hard facts.

I decided to try this soup for a couple of days, and discovered that not only is it delicious, but it’s satisfying as well.    And in fact, I have a second pot of the soup going now.

I did change it a little.  I thought the first pot was kinda bland, so I added some Sambal Oelek to it, and found out I’d added too much to my bowl of soup, so I dumped it back into the pot and then ladled out another bowlful and that had the right amount of spice.   Which while good, was still missing something.

So this time round I’m experimenting with it, bowl by bowl.

Kitchari Soup Recipe

1 cup dried split mung beans, rinsed in fresh water (you can find them in specialty stores or maybe even your own supermarket.)
1/2 cup basmati rice
1 tbsp. fresh grated ginger (I use my frozen ginger root that I keep in the freezer)
1/2 tsp. ground ginger (if you like ginger)
1 tsp. ground Coriander
1 tsp. ground Turmeric
1 tsp. Cumin Seed
1 tsp. Mustard Seed
1 1/2 tsp. ground Cumin
10 cups water
Top with chopped Cilantro to taste after cooking

Heat a pot up, then add the spices and let them toast a minute.

You wouldn’t believe the flavours that come out when you do that.  Or how good it smells.  Add the water and the rice and mung beans.   Simmer for about 30-40 minutes or until the rice is cooked.  The beans will cook out and disappear into the soup.   (I’ve also toyed with the idea of using my immersion blender and whirling it into a nice creamy soup).

Serve with some fresh chopped cilantro on top and a dash of salt, if needed.  I chose not to add salt to the soup but like to add just a teeny grind of fresh sea salt to the bowl of soup before I eat it.

I also added just a little cayenne pepper as well as the cilantro and that took it over the top, flavour wise.

As well as some fresh ground cardamom.  You didn’t think the Dane in me was going to not show up, did you?

You can add veggies to the soup as well.  Some people do, and some don’t.  The combination of rice and beans means you are getting a complete protein, and in fact, it keeps your blood sugar nice and steady.
Here’s a couple of websites where you can check out some more versions of the soup.

All about Fasting
Macrobiotic on About.com
Organic Healing Arts
Eclair.name

But in the meantime, I’m going to finish my soup.

Herbie the Chicken


Or should that be Herby Chicken?

hmmmm

Well, I may have gotten carried away the other day when I decided to defrost and cook a lovely big roasting chicken I had in the freezer.

It was so pretty, big and plump and juicy.

And it was also hot outside so I didn’t want to cook it in the oven, like I should have.

I decided to cook it in the crock pot and I think I outsmarted myself.

I did, actually.

I thought 4 hours in the crockpot would be OK, but it was about 2 hours too long.   My poor chicken fell apart.

And the fresh herbs, well, they kinda over took the chicken and hijacked it.

But the beginning of it was just fine.

I took a half lemon (and cut the skin off and used it in the Lemon Extract)  and two garlic cloves, put them inside the cavity and then browned the chicken in some EVOO and butter.


Placed the chicken in the Crockpot. Added a half cup of Riesling wine, cause it was sitting on the counter  and I still had a half bottle left from the weekend.

Then I went out in the garden, well, to my herb pots and picked some fresh oregano, mint, thyme and parsley and raided a few leaves off of the Celery plant as well.

Took them in the house, gave them a rinse, then popped the herbs into the pan I’d browned the chicken in, just wanted to get the herby oils released from the leaves and then added some of my Home Made Chicken Stock, about 2 cups worth.

***Hint*** If you make your own stock, freeze it in a muffin tin.  Each depression holds about 1/2 cup.
***Hint***  If you are using fresh herbs, remember that they are a lot stronger in flavour than dried herbs.  In other words, you get more oomph for your recipe.

I then put the herbs on top of the chicken, put the lid on and walked away.


If you noticed I did not salt and pepper anything.  The chicken stock was well seasoned and the herbs, well, they took the place of the stock.

After 4 hours, I decided to take the chicken out of the crock pot and it fell apart. sigh.  But all the wonderful liquid in the bottom was good.  I used part of it for a gravy and froze the rest.
I really liked the taste, especially since I sautéed some frozen veggies with some leftover rice for my side dish.

It was a little too herby for my DH’s taste, but I noticed he ate all the breast meat anyway.

Stone Soup


I was hunting something in my freezer last week, and had pulled out all manner of bags and containers with bits and pieces of food that I didn’t want to ‘waste’.  And after taking a look at this pile of bags, etc., sitting on the island I got an idea.

Stone Soup…

Only a few things were labeled, no dates, and not enough of any one item to make a meal of.

I started thinking of the parable of the beggar who made a pot of soup using a stone as the starter and the villagers each contributing a little something, some herbs, a few carrots, some potatoes, and the beggar ending up with a great big pot of soup that would feed the village.

So I threw the all those ingredients into a pot.

Added a little water, just so nothing would scorch while the stock thawed.

Picked some fresh oregano and thyme from one of my herb pots outside.

Added that in and put a lid on the pot and let it simmer for an hour or so…

And there you have it.  My version of Stone Soup.

Here’s the list of what went into the pot:

Green Pepper (maybe half of one)
Red Pepper (half of one)
Tomato’s (leftover diced tomatoes from making Taco’s)
Red Onion (half of a red onion)
Field Peas and Snaps (had a partial bag)
Leeks  (leftover from when I made the Leek Pancakes)
Chicken Juice (not quite stock)
Chicken Stock
Andouille Sausage (leftover from making Jambalaya the last time)
Mushrooms
Pork Roast (just a couple of slices)

The only fresh stuff in there were the  few sprigs of Thyme and Oregano from my pots outside, I then simmered the soup for about an hour or so before tasting it for seasoning.    Found out I didn’t need to add any salt, the spice from the Andouille Sausage gave it a nice kick and I now have lots of soup.  After eating some of it, I did consign the rest back to the freezer.

At least this time the packages are labeled and dated.