Tag Archives: Green Onions

Asian Style Turkey Meatballs


I was in an Asian kind of mood for Tapas this month.    I’d planned on making   Sushi and Spring Rolls, and I wanted to also make a protein of some kind as well.  I was thinking  pork, cause let’s face it, pork and sweet and sour sauce or Soy Ginger dipping sauce, it goes so well together.

But as I was rooting around in the freezer, I ran across some ground turkey and a light bulb went on over my head.

OK, so I hit the light switch with my elbow.

sheesh

I wanted to give it some Asian style oomph so I did what any self-respecting cook would do.  I typed  Asian Meatballs with Ground Turkey into a search engine and found several sites.   And they all had something in common,  actually they had a lot in common.

There were two sites who had the same recipe, and not one of them credited the other one.  But I’m not like that, so here are the sites I went to, this one   then this one, with the same recipe.  And the final site I checked out.
They all had turkey, green onions, bread crumbs, sesame oil and an egg in common.

I figured I was on track then.  I had all the ingredients so I went to town.

Well, not really, I didn’t want to go to town, I just wanted to use what I had on hand.
So, I thawed out a pound of turkey, and added an egg, some panko bread crumbs, sesame oil, chopped green onions (scallions if you prefer), chopped cilantro, soy sauce, some grated ginger and a little more sesame oil.    Mixed it all up and fried a little of the meatball mixture to see if I had the seasoning right.

The time to correct seasonings is before you cook it all up, not after.

Believe me when I say I’ve done that before and really regretted it.   That is, cooked the entire recipe  and didn’t taste test it first.

Recipe
1 lb. Ground Turkey
1 large egg
1/2 cup panko bread crumbs
2 teaspoons Sesame Oil
2 teaspoons Soy Sauce
4 green onions, finely chopped
1/2 cup Cilantro, finely chopped
1 tsp. ginger, grated.  (I keep a ginger root in the freezer all the time, and just use my Microplane on it when I need ginger)

Mix together well, and then take a bit out, fry it and taste for seasonings.   I didn’t add any salt or pepper to this, as there is a fair amount of salt in the Soy Sauce.

After taste testing it and correcting seasoning, in other words, adding a bit more sesame oil, (at least that’s what I did),  use a small scoop or a spoon, or just your hands and form small meatballs from the mix.  I used my littlest scoop and ended up with 24 mini meatballs.   I then placed them on a cookie sheet and baked that at 400 degrees for 15 minutes.

They didn’t brown real well, but when I checked the internal temperature, they had reached 165 deg.   So I pulled them out of the oven and let them cool.  (and forgot to take a picture).    I also ate one, just to make sure they were OK to eat.

And after all that, I then decided that maybe, if we had a crowd that I might not have enough.  So I grabbed another pound of turkey out, defrosted that and made another batch.

However, I didn’t realize that I’d used up all the green onions in the first batch, so I pulled a Vidalia onion out of the cupboard and grated up about a quarter of it, and added that to the turkey along with the seasonings.

Then I thought, “hmmm, I wonder if I can make this gluten-free by using some all-purpose gluten-free flour’ along with all the other stuff.  (and yes, I know these are not truly gluten-free as I did not use gluten-free soy sauce, but you can if you like)  And as gray pallid and pale looking the first meatballs were, I decided that this batch was going to be fried.  So I did, frying them in a little EVOO.

And they were good. 

This end had the non gluten-free meatballs, and they didn’t look all that appetizing, I thought.   Tasted wonderful dipped in the
Sweet Chili Sauce, but…

And this end of the dish (complete with note) had the fried, gluten-free meatballs.

I really loved how they tasted, both versions that is, and would do them again.

However, next time, I’m frying them, I think they not only look better, but taste better as well.

Salmon Mousse


I made some Salmon Mousse last month for Tapas and have to say I thought it needed something ‘more’.

I followed the recipe exactly, but…

So I headed back into town, 7 miles away for an extra ingredient, I ‘knew’ that adding some smoked salmon would be just the ticket.    Actually, I needed horseradish and napkins as well for Tapas, so it wasn’t a ‘one ingredient’ trip.

I had found the recipe for the Salmon Mousse here and since I had some salmon in the freezer, and wanted to do something fun with it, this seemed to be a natural fit.

I made the little tarts, poached some salmon I had in the freezer and proceeded to make them.  I didn’t care for the taste of the filling which is why I ended up heading back to town in search of some smoked salmon which I then added to the rest of the filling and decided it was as good as it was going to get.

And I have to admit, that even though I did not care for the tarts, one of my guests said that they did complement each other very well.

I guess I ‘taste tested’ it too much.

My ‘taste’ was tired.

Here’s the recipe for the Salmon filling first, and when I read the reviews of the recipe, they suggested making this the night before so that the ingredients could get acquainted overnight and pretend they knew it other very well.  So I did.  Make it the night before that is and stuck it in the fridge so the ingredients could get acquainted and meld together.

Here’s how I made it.

Recipe:
8 oz. Cream Cheese
1 cup fully cooked Salmon, skin and bones removed, or in this case, 4 small fillets that I had in the freezer.
3 oz. smoked salmon
2 tablespoons broth (I used the broth I poached the salmon in)
2 tablespoons Sour Cream
1 tablespoon finely chopped green onion
1 teaspoon lemon juice
1 teaspoon finely minced dill + dill for garnishing

Mix all the ingredients together and chill overnight so that the flavours will meld together and get acquainted.

I poached the salmon in a little water and white wine, then added some sliced lemons, dried dill and green onions.


Poached them gently then removed the salmon from the liquid, reserving a little of it for the rest of the filling.
When poaching fish, you barely cover it with liquid, never let it come to a rolling boil or even a simmer, you want the temp of the water to be about 180 degrees, this will cook the fish, really.

I let the salmon cool, then took out the dark bits, if you  have a cat handy, you can feed them this, or even give it to your dog if they like fish.  My current dog doesn’t like anything weird like fish, but…

Threw the flaked salmon into the bowl of my Kitchen Aid, along with the rest of the filling ingredients;


And let ‘er rip,  well, I mixed them together, and then they went into the fridge to rest.
While that was going on I made the tarts.

1/2 cup softened butter
3 oz cream cheese, softened
1 cup flour
Mix together and then turn out onto a pastry sheet like this.

I then kneaded it a little before dividing it up.

I knew this would make 24 tarts, so I divided it into four pieces…

Then cut each of the four pieces in half,

Each piece was then cut into thirds.  This way you know that the dough is divided evenly.

I rolled them into a ball, and pressed them  into my mini tart pans, making a shell of them.

Along the way, I had a helper, sigh…

She was more interested in the cupboard though, all that lovely space to explore.

No room for the bird in this cupboard…

After I baked the tarts at 350 degrees for about 15 minutes I took them out and was a little dismayed, they ‘ poofed’ up a lot, and when I tasted them, I really didn’t like the taste, so I decided to make some baked Wonton cups.

I just used a cookie cutter to cut rounds out, and then baked them in the oven.

I did learn a little trick.  I sprayed them, very lightly with some cooking spray before baking them.  This helped them to brown up and crisp without making them too hard.

I served some of them on some peeled cucumber rounds and decorated them with some fresh dill from my garden.

OK, so it’s just one little dill plant, but it will grow…


And I also served some of the salmon filling in the wonton cups, and they did disappear in short order.

Green Onion Spread


Many years ago I fell in love with this spread.  It was only available in limited amounts at a local grocery store.   They actually would make it and sell it at holiday’s but for some reason only made limited amounts at a time.

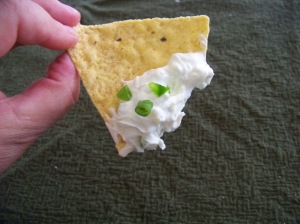
It was oniony, spicy, and oh so very good.    Lately I’ve been on a kind of kick of trying to replicate foods that I really like.   Why I never thought I could try to do this before, I have no idea.   100_7318

I made this last weekend and took it to a weekly gathering I attend, and watched people just inhale this.  OK, so they scooped it up with crackers, but they loved the taste.


Ingredients

8 oz Cream Cheese, low-fat is fine here
4 oz. low-fat sour cream
2 tablespoons mayonnaise
1 bunch green onions, minced
2 cloves garlic, minced
1/2 jalapeño, minced  (or you could add more)
1-2 ounces finely shredded Pepper Jack Cheese
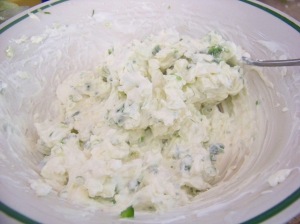
To start with, chop up a bunch of green onions, or scallions if you choose.   I cut them lengthwise into quarters, and them sliced them across so they were minced.   You really don’t want chunks of onions if you can help it.   I then took a clove of garlic, from the elephant garlic I had bought, and minced that finely.   I went to the freezer and took out a half of a frozen jalapeño and minced it.   Dumped it into the bowl and added an 8 oz. block of room temperature cream cheese, mixed that together with the onions, garlic and jalapeño.
100_7313
Add the sour cream, grated Pepper Jack Cheese, and mayonnaise.    Taste at this point and you can add more Jalapeno or more cheese or just leave it as is.
I served this with some Pretzel crackers but it also tasted great with Tortilla Chips.     I also think this would be awesome on some baked potato’s, or some fresh french bread or ….
Gotta stop now, and go make some more.   I’m getting all kinds of ideas.

Spanakopita Bites


I found some Phyllo tart shells on sale a while back and bought them without knowing just what I was going to make with them.   And then I remembered my friend Debi and the great Stuffed Grape Leaves she showed us how to make.   Well, that day we also made some Baklava and since there was a bunch of Phyllo dough scraps left over, Debi made some Spanakopita tarts.  And they were so good and disappeared so fast.

So, guess what?   I was totally shameless and stole her idea so I made some for the Boat Club Potluck this month.   I’m not using leftover phyllo dough, but I am using the phyllo or fillo if you insist, pre-made tart shells I bought.

It just so happened I also had some Feta Cheese in the fridge, as well as some Parmesan Cheese and the tart shells, and onions, and eggs, and I found a package of frozen spinach buried in the bottom of the freezer as well.   I had all the ingredients.    Don’tcha just love it when it all comes together?

   Nice little bites of goodness, well, I thought they were.   Although Debi did tell me I didn’t put enough onion in them, so next time, I’ll up the onion, or better yet remember to put the minced onion and garlic in them in the first place.  I don’t know what I was thinking, but I sautéed the green onions, and totally spaced the minced onion  and the garlic clove,   sitting on the counter all by its lonesome afterwards as well.  sigh.   I was in a hurry to get these made and I forgot stuff.  So here’s the real recipe and do as I tell you, not as I did.  However, the Spanakopita Bites, still tasted good, just not as good as they could have.

30 Mini Fillo Shells, brushed with butter and set aside.

1 8 oz package of Frozen Spinach
4 oz. Feta Cheese, either the block or crumbles
1/2 cup grated Parmesan Cheese
4 green onions
1/2 cup onion
2 cloves garlic
2 eggs
2 tablespoons milk
1 tablespoon Olive Oil

Preheat the oven to 350 deg.
Thaw the spinach and put into a colander to drain, then squeeze out the liquid.  Do a rough chop if needed, makes it easier to fill the tart shells if you don’t have to deal with a bunch of stems.
Saute’ the onions til they have softened about 5 minutes, then add the garlic, stir around for about 30 seconds, take off the heat and set aside.
Place the spinach, cheeses, onions and garlic into a bowl, then pour over the lightly beaten eggs and milk, mix together.

Spoon some of the filling into the tart shells, and bake for about 20 minutes or so until they have browned  and the egg has cooked through.

Don’t forget to sample one as you take them out of the oven, you need to make sure they are edible after all.

Serve warm or at room temperature.    You can also make these ahead of time, and just warm them in the oven for a few minutes, they are very forgiving that way.

Sushi, California Rolls


I was asked for this recipe the other day.   Apparently some people really liked it when I made it and served it at a couple of different parties.     Oh, I’m talking about Sushi.   At least the kind of Sushi that’s for the not so adventuresome among us.   Which would be me.   I’m leery of raw fish, unless I’m the one who’s working with it.  Which is why California Rolls are perfect for me.

It also doesn’t hurt that I like Avocado, Crab and Rice either.   Or that I like trying to make new recipes all the time, and Sushi or rather California Rolls are one of my favorites.

The Cast of Characters:

Most of the characters, at least the basic cast, without the extras.

A couple of tricks first.   Rinse the rice before cooking it, it seems to help it develop the sticky factor you need.   And do not stir the rice after adding the rice vinegar/sugar mixture.   Cut and fold it as if you were adding flour to egg whites, you don’t want to mash the rice, just make sure the rice vinegar is incorporated into the rice.   Use the bamboo paddle and make sure that the shallow bowl you put the cooked rice in is big enough that you can do the cut and fold without doing a ‘rice mash’.  It’s best to do this while the rice is still warm as it absorbs the vinegar best this way.

Toast the sesame seeds while waiting for the rice to cool enough to work with.  Set them aside.
Grate some carrots, and make some pickled carrots to serve with the sushi or put some into the sushi.
I did a fine grate and added some rice vinegar and a little freshly grated ginger.    Not very much, just enough to taste.    Set those aside.    Open a can of crab or get your fresh crab out and rinse and make sure there aren’t any nasty pieces of shells in there.   You don’t want to cut the avocado until you are ready to start rolling.   They tend to turn a nasty shade of brown.

First off, place a sheet of plastic wrap on top of the bamboo rolling mat.   You’re going to sprinkle some sesame seeds down first and they tend to fall through the mat otherwise, and the rice grains get stuck there as well, and that makes the mat hard to clean.  Trust me on this, they are not easy to get out.   Really.

Then put a thin layer of rice on top.   Pat it down with your wet hand.

If you notice there is a bowl of water to the right of the bamboo mat, this is very important, you need to keep your hand wet, otherwise the rice sticks to everything.
Next add a sheet of Nori,

Then add your fillings, some avocado and some crab:

Roll it up using your sheet of plastic wrap.
Shape it a little so it’s nice and round and place in the refrigerator.

Take out a little later and slice.
Continue using the rest of the rice and Nori.   I alternated by putting a sheet of Nori down first, placing a thin layer of rice on that with the fillings and then rolling those up.  (I did say I forgot to take pictures, I was on a roll, did you get it?, on a roll?, umm, never mind. )
Here’s a picture of the finished platter with the wasabi, carrots and sesame seeds to go with them.  You also need some soy sauce for dipping.

California Rolls

4 cups cooked sushi rice
2 tablespoons rice vinegar
2 tablespoons sugar
Mix the vinegar and sugar together until the sugar dissolves and sprinkle over the rice, folding it over itself, so you don’t mash it.  This should be mixed together while still warm.    Set aside to cool.
1 avocado cut in strips
1 can crab or sushimi or whatever you like
3 small carrots, shredded and dressed with rice vinegar and fresh ginger
2-4 spring onions
thin strips cucumber if you like, I didn’t but that’s because so many people I know can’t tolerate cukes.
toasted sesame seeds or
black sesame seeds

Layer the rice on the nori, place a couple of pieces of avocado and some crab on there, roll it up and place in the fridge in some plastic wrap.   Continue with a roll with some spring onions and carrots, or whatever you like inside.
Slice thinly, each roll will makes about 8 slices, and serve with some wasabi, soy sauce, sesame seeds and carrots.