Monthly Archives: June 2013

Ramp and Mushroom Tart


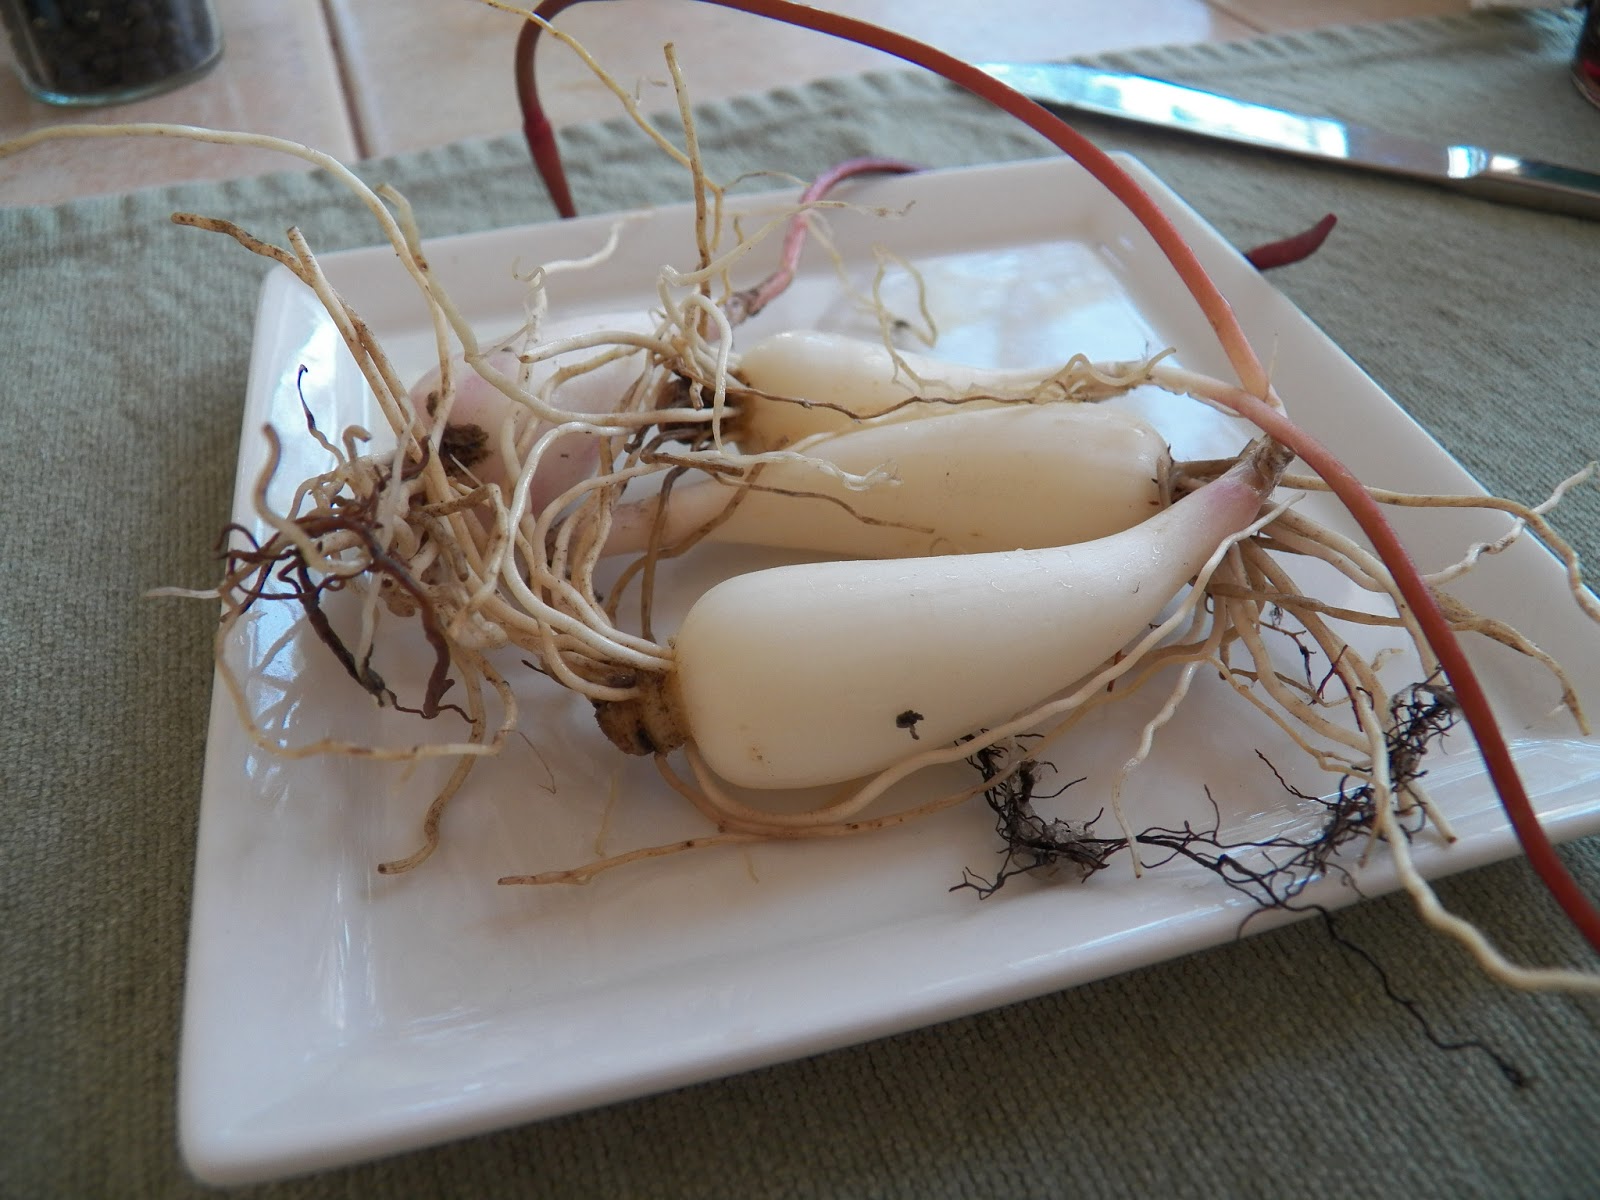
I told you about my incredibly generous and thoughtful friend who gave me some Ramps earlier last week.   And they were so good with a simple scrambled egg and toast.  Sublime in their simplicity.

Well, I still had a few ramps left and thought they would be good with some mushrooms, so I googled ramps and mushrooms and came up with a bunch of ideas.   Amazing how many great minds think alike about stuff like this.   Here’s the link to my inspiration for this tart.   I got it from Saveur but there were a couple of issues with the recipe.  However, I persevered.

I had some goat cheese already and I always have puff pastry in the freezer, whether it be commercial or home-made.  This time of the year it’s the commercial stuff, cause it’s too hot to make my own.

And wow, it just so happened that all this came together in time for our June Tapas Night.   How fortuitous is that?

Of course I did make a few changes, but honestly, I don’t think anyone would have noticed.    I did not use as much olive oil as the original recipe called for and I did not have fresh thyme.  (note to self, get that plant started, sheesh) .   And my ramps did not have the green tops, so they were sliced and sauteed.

2 tbsp. olive oil
10 oz. button mushrooms, thinly sliced
1 shallot, minced (I used a bottled one I had on hand.)
Kosher salt and freshly ground black pepper, to taste
1 tsp. finely chopped thyme leaves, plus whole leaves to garnish
2 tbsp. unsalted butter
20 ramps (about 4 oz.), trimmed
4 oz. goat cheese, softened
½ cup freshly grated parmesan
2 tbsp. sour cream
2 tbsp. lemon zest, divided
1 egg yolk
1 sheet frozen, thawed puff pastry
Fleur de sel, to taste

1. Heat 1 tbsp. oil  plus one tbsp. butter in a 12″ skillet over medium-high heat. Add mushrooms, shallot, and salt and pepper; stir to coat in oil, and cover skillet. Cook until mushrooms release most of their liquid, about 5 minutes. Uncover and continue cooking, stirring occasionally, until all liquid is evaporated and mushrooms are browned, about 10 minutes more. Transfer to a bowl and set aside to cool.

2. Return skillet to heat along with remaining oil and butter. Add ramps; cover, and cook until barely tender, about 8 minutes. Uncover and cook, tossing occasionally, until lightly browned, about 5 minutes more. Transfer to a plate and let cool.

3. Heat oven to 375°. In a medium bowl, stir together goat cheese, parmesan, cream, 1 tbsp. lemon zest, egg yolk, and salt and pepper until smooth; set aside.

Place puff pastry on a floured work surface and roll into a 16″-long rectangle. Transfer dough to large cookie sheet.   Spread mushrooms over bottom of dough;

place dollops of cheese mixture over mushrooms and using your fingers or a spatula, spread cheese as much as possible over mushrooms.

Arrange ramps over cheese and mushrooms,

and then fold and crimp edges of the pastry, to form a rim.   Bake tart until crust is golden brown, about 30 minutes.

4. Transfer tart to a wire rack and let cool.  Slice and transfer to a serving platter.

Sprinkle remaining lemon zest over the top of the tart along with thyme leaves and fleur de sel. Serve at room temperature.

I just thought I’d leave you with a shot of my counter.   I’m not one of your neat and tidy cooks.  sigh.   I try, but gee, I just get too many things going on at once and then you have this.


I had a bunch onions I’d sliced and caramelized for my Mushroom and Caramelized Onion Tart, plus of course I was also prepping the ramps, and mushrooms and trying to stand on my head while answering the phone and ….   You get the drift.

Ramps


What are Ramps you ask?  Well, I had to.  Ask that is.

Basically Ramps are wild onions gathered and eaten in the spring, usually around May.

I’d seen a few recipes that called for Ramps over the years in various blogs, and they were something that intrigued me, a lot.   I love onions, oniony things of all sorts.   Wait a minute, is oniony a word?  Never mind, I love onions, raw, browned, fried, however you want to fix them, I love them.   Even if I have to go and brush my teeth right afterward cause the onion flavour tends to linger.  TMI?  Never mind.

A chance conversation with some friends a couple of weeks ago led to my being gifted with some Ramps the other day.   I got so excited.   And when I was asked how I was going to fix them, I said immediately, I’m going to sauté them gently

and then fold them into some scrambled eggs and eat some that way.

So I did, and had them for breakfast this morning with some lovely sourdough whole wheat rye bread.  (the bread was some another friend had gifted me, do I have awesome friends or what?)    And OMG, it was so good.   I just have one question, is it too soon to have breakfast again?

Never mind.

Since I’d never cooked Ramps before I did not want to overcook them, so these were a touch undercooked and a bit on the crunchy side, but I ate them anyways.     I have a few left and have plans for them as well.

To start with I cut off the roots, as close to the roots as possible (I didn’t throw them away though, I have plans for them).
Washed them, and then cleaned the top a little, that is the red thing you see.

and another shot

Well, they were so pretty…   Kind of like ART on a plate.

I cut them lengthwise in quarters and sautéed them gently in some butter before I added them to my almost finished scrambled egg.     And when I tasted them, well, gee I can now understand why they have festivals celebrating Ramps.

If you have a chance to try some, please don’t hesitate, and if you have a few extra’s and feel generous, I’m over here.    Just kidding, I think.

Flourless Chocolate Cake


I finally got to make it, a Flourless Chocolate Cake that is.   Usually when I make a chocolate cake for a birthday I use a mix.   Cause the person I make the cake for likes that kind of cake.   However, I’ve wanted to make a flourless chocolate cake for a long time, and Yay Me!!!!, I did it.   And it was good.   It also won’t be the last time I make it either.

I guess I should tell you I made it for a friend who attends those Friday Night NPA get togethers. I have to admit, I used her birthday as an excuse to bake this.

I started off with looking at a lot of recipes online, and finally I took some of this and some of that and figured out the ratio’s and here it is.     Well, first off, I got the base recipe here  They call it a French Flourless Chocolate Cake, and I won’t argue with that.   But the basics of many of the recipes I did read said to melt the butter and chocolate together,  mix the eggs and sugar together and bake it.

I had some Baker’s Semi Sweet Chocolate in the cupboard anyway, I try to keep a package handy, so many recipes call for chocolate.   And the reason I keep this on hand, quite frankly, it fits my budget better than say Scharffen Berger or other artisan chocolates.   And my local grocery store actually stocks it as well.    And of course, my Land of Lakes Butter.

Have I said before that I love my Kitchen Aid mixer?  Well, I do.   And that is important here.
I creamed the eggs and sugar together until the sugar had dissolved completely before I added the barely warmed and melted chocolate, and then folded in the egg whites, which I’d beaten into a glossy meringue.

Sorry got carried away there, but really, it was a beautiful thing.

Start with, melt the butter and chocolate together, either over a double boiler or in the microwave.   I have a little teeny double boiler I use, and I do not get the water really hot, cause I just want it warm enough to melt the chocolate and butter together.

Got that melted and set it aside to cool down a little while the egg yolks and sugar got creamed together.

Whipped the egg whites until glossy, and added some of the sugar to it, just wanted to make it a little like a meringue.

Very important here, don’t add the hot chocolate you just melted into the beaten egg yolks, you’ll just get chocolate scrambled eggs, and  I really don’t think that would taste good.

I drizzled in the melted chocolate and butter into the mixer and beat it until it was well combined.

I then took the egg whites, and dumped them down on top of the chocolate mixture and folded them in.   The proper way.

Which is basically this;  You use the spatula and turn the mixture towards you, scooping under chocolate and cutting through, then turn the bowl a quarter turn, do the scooping motion and cutting motion again.   This keeps the egg white from breaking down a lot.  Of course the chocolate mixture is pretty heavy, but still.   Continue doing this until the egg whites are incorporated.   Finish by pouring into a greased and papered spring form pan if you have it.   Which I don’t (yet), so I used my handy cake pan which has a built in bar which can loosen a cake from the bottom.   I greased it and dusted it with cocoa powder.

I love this pan and it’s sister as well.  Trust me on this, it has saved me a lot of grief when a cake stuck to the bottom of the pan and I could not get it out to save my life.

Pour the cake batter into the pan, and then do like I did, figure out that you made too much batter, and hurry up and grease some cupcake papers and pour the remainder of the batter into them.    I forgot to take a picture at this point so had to shoot the picture of the cake and cupcakes after I’d put them into the 350 deg. oven.   I swear sometimes, I just forget, I get so excited with what I’m doing.   I guess you just have to put up with me on this.   I cook real food for real people, and not for the blog, of course after 200 posts I should have figured it out.

Let them bake for about 30 minutes and took the cupcakes out, let the main cake bake another 10 minutes until a toothpick came out clean.   The interior was still fudgy and gooey.   I know this cause when it came time to cut it, I saw that.

Now even though I’m not that fond of chocolate I did do a taste test.   Well, I’ve never made this kind of cake before and I wanted to make sure it was edible.
It was.

I also made a white chocolate caramel sauce to serve over the cake.  I experimented on myself with that one.   I just wanted to make sure it was good enough to eat.   And all I can say is Nona was just lucky I left enough of the sauce to top the cake slices.   I can live without chocolate, but Caramel, well, that’s a totally different story.

Here is the cake, just as I was cutting it.  And yes it is supposed to look like that on the top.
It has little crackles in it.

I guess you want the recipe don’t you?

French Flourless Chocolate Cake

7 oz (200 g) semisweet chocolate  I used 6 squares of Bakers and one square of Bakers Unsweetened Dark Chocolate
4/5 cup (200 g) butter
1 cup (220 g) sugar
5 eggs, separated


 Preheat oven to 350deg F
Line a 9 inch cake tin with greaseproof or other non-stick paper and grease the tin. Or use a springform pan.
Break the chocolate into small pieces and melt it with butter over hot water.  I don’t like getting it too hot.
Beat the egg yolks with 3/4 cup of the sugar.
Fold in the melted butter and chocolate mixture after it has cooled down a little, otherwise the eggs cook.
Beat egg whites until frothy by using an electric mixer; gradually add the remaining sugar, beating until stiff peaks form.
Fold the beaten egg white into the chocolate mixture, gently.
Bake at 350 degrees until a wooden pick inserted in center comes out clean, approximately 40 minutes.

Use a knife to separate the cake from the non-stick paper. Please observe that the cake is quite sticky!  I used the bottom of a plate placed on top of the cake to kinda hold it place, the tipped it out of the pan, I then placed the serving plate under the cake bottom and up ended it, so it was right side up.

The Flourless Chocolate Cake may be served warm or cold with whipped cream. The cream may be dusted with cocoa powder before serving, and the cake may be dusted with powdered sugar.  I think some lovely sliced strawberries would go well with this as well.
I served it with a home made white chocolate caramel sauce.

Caramel Sauce
Melt some white chocolate chips into some warmed heavy cream.  ( I didn’t measure so I’m guestimating)
1/4 cup white chocolate chips
1/4 cup heavy cream
Mix together, and then in a small pan
caramelize 2 tablespoons sugar, just until it melts and starts to turn color.   Ad 1 tablespoon butter, mix together.   Pour in the white chocolate mixture and let it cook, stirring constantly until the sugar has dissolved back into the liquid.    This will take a couple of minutes.   Take off of the heat and serve over the Chocolate cake.

Or, melt some caramels, or use some of my Home made Caramels, and add to some sweetened condensed milk (Eagle Brand), and heat together until the caramel is melted and stir until incorporated.

Dog Food, the Homemade kind


I read labels, all kinds of labels, on the foods I eat and labels on the food that I feed my dogs.     Go ahead and read the labels on your dog food, I’ll wait.

Well, could you pronounce half the stuff they put in there?

I can’t, and I’m really pretty good at this reading stuff.    I don’t even know what most of that stuff is.    Which brings me to what I do.    I make the majority of the food my dogs have eaten over the past 30 or so years.     And the end result is, I have had happy, healthy dogs.   Their skin is good, their fur is nice, they have energy and very little ill health.    I used to just cook up meat, add some veggies and rice and call it a day, but over the years I’ve refined the recipe and now I make up the same basic meatloaf each time.

Chimi on left and Mauli on the right with their buddy Sam in the middle.

Around here we call it Mauli Loaf in honor of our dog Mauli.     She was the reason I refined the Mauli Loaf recipe over time.

Mauli chasing Chimi, she’s 14 years old here.

When we first got Mauli she was a three year old, former breeder and you could tell she needed something extra.    She’d just finished weaning her latest and last litter and it showed.   So, I started off feeding her canned food along with some dry foods.    That was OK, but the stuff in the cans stunk and made her stink as well.   (go ahead, give your dogs a good sniff, do they smell a little funky? Yup, it’s the food.)

So I started making her some food, and through trial and error, came up with a basic formula.   Mauli was more than happy to eat all the different versions, some a little more happily than others, but for the most part she gulped them on down.   She thought she was eating people food, giggle.    I started off with equal amounts of ground beef, and vegetables, added brown rice and oatmeal along with some eggs, mixed it all together and baked it.   Oh and I almost forgot, 1 good tablespoon of garlic powder was mixed in as well.   I used to bake it, and then weigh out exactly 11 oz. per meal and she would eat it.   Then we got a second dog and  I was making meatloaf a couple of times a week.    Our new dog was also a rescue and she loved to eat Mauli Loaf as well.   Then a couple of years ago I started using chicken in place of the ground beef and Mauli liked it even better, umm, did I mention that chicken was her favorite animal protein?    Have you checked out the price of ground beef?  Yikes, and you can get chicken leg quarters for as low as 49 cents a pound on sale.    Need I say more?  I’ve also priced this out and it is comparable with canned food price wise, and if you have the freezer space you can make it once a month or so and freeze it.  That’s what I used to do when I had a larger freezer.  And yes, it is a hassle to make homemade dog food, but so worth it.

At any rate, for the past couple of years I’ve cooked up chicken and then added it to the frozen veggies, brown rice, oatmeal and eggs and bake that into a meat loaf style food.     I try to cook as much as I can ahead, but still ended up making them food at least once a week.     I used to love watching the dogs play for hours, especially when one of them was over 13 yrs old and the other 4 yrs old. (Mauli lived to be 15 1/2 before her age and general health betrayed her and we had to help her cross the Rainbow Bridge)     Mauli did have some older dog issues, mainly weak eyesight and her hindquarters were also weak, but her zest for living, and playing with her ball for hours, well, let me put it like this, I  continued to make the effort of home made food for them.
My vet also suggested adding some olive oil to the food, a couple of tablespoons a day, so when I heat the food up in the fry pan, I add the oil in there.    And even though I am down to one dog at the moment, I still make Mauli Loaf as needed.   And Chimi appreciates it.  I do want to mention that Chimi was also a rescue dog and was severely underweight when we got her, so it was just as important to make sure she had good food to help build her up again.

Oh and by the way, both my dogs had a healthy weight  when checked out by the vet, and neither one seemed  to crave more food than the Mauli Loaf with some dry dog food as a side.   Their breath was not as rancid as when they ate commercial foods either.


Mauli Loaf Recipe

2 lbs, chicken, cooked and taken off the bone ( I either cook them in the crock pot or on top of the stove til the meat is ready to fall off of the bone)
2 lbs. Frozen Vegetables  ( I prefer Peas and Carrots, they seem to be more digestible)
4 cups cooked brown rice  (you can use instant brown rice as well)
4 cups oatmeal
3-4 eggs.
2 cloves of garlic cooked with the chicken or 1 teaspoon garlic powder
Water or the chicken stock you cooked the chicken in. Enough to moisten the oatmeal thoroughly.   I usually add a couple of cups of water along with the eggs, I can always add more.    Skim some of  the chicken fat off the top, some fat is good, but it can really do a number on my older dog’s digestive system.    However, if you are in a cold climate, fat is good.  It burns off as energy for the dogs.

Mix all together and place in a pan and bake in the oven for  90 minutes or until the temp reaches 180 deg.
Cut into chunks and serve them to your dog.    Refrigerate it for serving over the next couple of days.    I have to admit to warming it at this point, either by zapping it in the microwave or in a fry pan.   Both dogs liked it better that way.   And by warming it in a fry pan, you can add a couple tablespoons of olive oil, good for the dogs.